Create a document renderer template
OA documents are both machine- and human-readable. Each OA document file is stored in a .json format, which makes it possible for any application to process the content more easily. To present the data file in a human-readable format, a renderer needs to be written.
In this guide, you will build and deploy the renderer to display data from a 📜 Certificate of Completion.
This renderer is a static website that will be embedded in compliant OA viewer. It will take in the OA document in the raw form and generates the corresponding HTML code for rendering.
Prerequisites
- Download Git and install it on your computer.
- Download Node.js and install it on your computer.
- Have your GitHub account registered to access the repositories.
- Have your Netlify account registered to deploy your document renderer site.
- Get basic React.js and TypeScript knowledge to develop your document renderer.
Cloning the decentralized renderer React template
Download a template for building your own document renderer from the OpenAttestation template repository.
Cloning the code repository locally
git clone https://github.com/Open-Attestation/decentralized-renderer-react-template.git
cd decentralized-renderer-react-template
rm -rf .git
Cleaning the template
To develop a renderer that works properly, start with cleaning the template:
- Remove the folder
src/templates/customTemplate - Remove the folder
src/integration
Once you have finished the tutorial, you can clone the repository again and examine the deleted files.
Installing the code dependencies
Run the command below:
npm install
Running the development preview
Run the command below:
npm run storybook
Development environment
After running the Storybook, you will see the template samples at http://localhost:6006/.
This is a live preview to see the changes when you:
- Edit the raw document data in the Knobs tab
- Edit the template code to render the data
Developing the document renderer
After setting up the development environment, start writing our document renderer.
-
Define the data structure of our 📜 Certificate of Completion (COC).
-
Write the renderer to render the HTML code for the data provided.
Updating the sample document data and type
To update the raw document data and the corresponding data type, edit the data definition file at src/templates/samples/customTemplateSample.ts:
import { v2 } from "@govtechsg/open-attestation";

export interface CocTemplateCertificate extends v2.OpenAttestationDocument {
  name: string;
  recipient: {
    name: string;
  };
}

export const cocTemplateCertificate: CocTemplateCertificate = {
  name: "OpenAttestation Tutorial Certificate of Completion",
  issuers: [
    {
      name: "My name",
      documentStore: "0xBBb55Bd1D709955241CAaCb327A765e2b6D69c8b",
      identityProof: {
        location: "broad-tomato-ferret.sandbox.openattestation.com",
        type: v2.IdentityProofType.DNSTxt,
      },
    },
  ],
  recipient: {
    name: "John Doe",
  },
  $template: {
    name: "COC",
    type: v2.TemplateType.EmbeddedRenderer,
    url: "http://localhost:3000",
  },
};
Document objects explained
In the above OA document, you will see four root objects:
1. $template
The $template key describes the template name used to render this display. It should have the following keys:
-
$template.nameis the name of the template used to render a given OA document. Using this, a single document renderer will be able to render multiple types of OA documents, each with a different template name. -
$template.typewill always take the value ofEMBEDDED_RENDERERfor documents rendered in this way. -
$template.urlwill be the remote URL where your OA decentralized renderer resides. For now, set it tohttps://localhost:3000but you need to change this value later on in the Deploying the document renderer section.
2. name
The name key is a compulsory key to describe the OA document type. In this case, you are creating an OpenAttestation Tutorial Certificate of Completion.
3. recipient
OA documents do not have a strict data structure. Therefore, the issuers of documents need to define their own data schema. The recipient object is a user-defined object that describes who the certificate is conferred to. In this case, replace John Doe with the actual recipient name.
Note: This guide focuses on the simple document. In the next tutorial, you will learn more about the OA document schema and how to define a custom data structure.
4. issuers
For more details, see Creating raw document.
Developing the COC template view
After you defined the structure of data, the next step is to style the 📜 Certificate of Completion.
To change how the data is being rendered, create a React component that takes in the raw document in the document props and render the corresponding HTML code.
Your 📜 Certificate of Completion will display some text similar to the following:
OpenAttestation Tutorial Certificate of Completion
awarded to
John Doe
- Create a file named
src/templates/coc/template.tsxwith the following content:
import React, { FunctionComponent } from "react";
import { TemplateProps } from "@govtechsg/decentralized-renderer-react-components";
import { css } from "@emotion/core";
import { CocTemplateCertificate } from "../samples/customTemplateSample";

const containerStyle = css`
  background-color: #324353;
  color: #ffffff;
  padding: 15px;
  margin: auto;
  width: 80%;
  text-align: center;
`;

export const CocTemplate: FunctionComponent<TemplateProps<CocTemplateCertificate> & { className?: string }> = ({
  document,
  className = "",
}) => {
  return (
    <div css={containerStyle} className={className} id="custom-template">
      <h1>{document.name}</h1>
      <div>awarded to</div>
      <h2>{document.recipient.name}</h2>
    </div>
  );
};
-
Add a story to view it.
At the same level with
src/templates/coc/template.tsx, create a file namedtemplate.stories.mdxwith the following content:
import { Meta, Preview, Props, Description, Story } from "@storybook/addon-docs/blocks";
import { object } from "@storybook/addon-knobs";
import { CocTemplate } from "./template";
import { cocTemplateCertificate } from "../samples/customTemplateSample";

<Meta title="MDX|CocTemplate" component={CocTemplate} />

# CocTemplate component

<Description of={CocTemplate} />

# Props

<Props of={CocTemplate} />

# Usage

<Preview>
  <Story name="basic sample">
    <CocTemplate document={object("document", cocTemplateCertificate)} />
  </Story>
</Preview>
-
Make sure your component looks like the following:
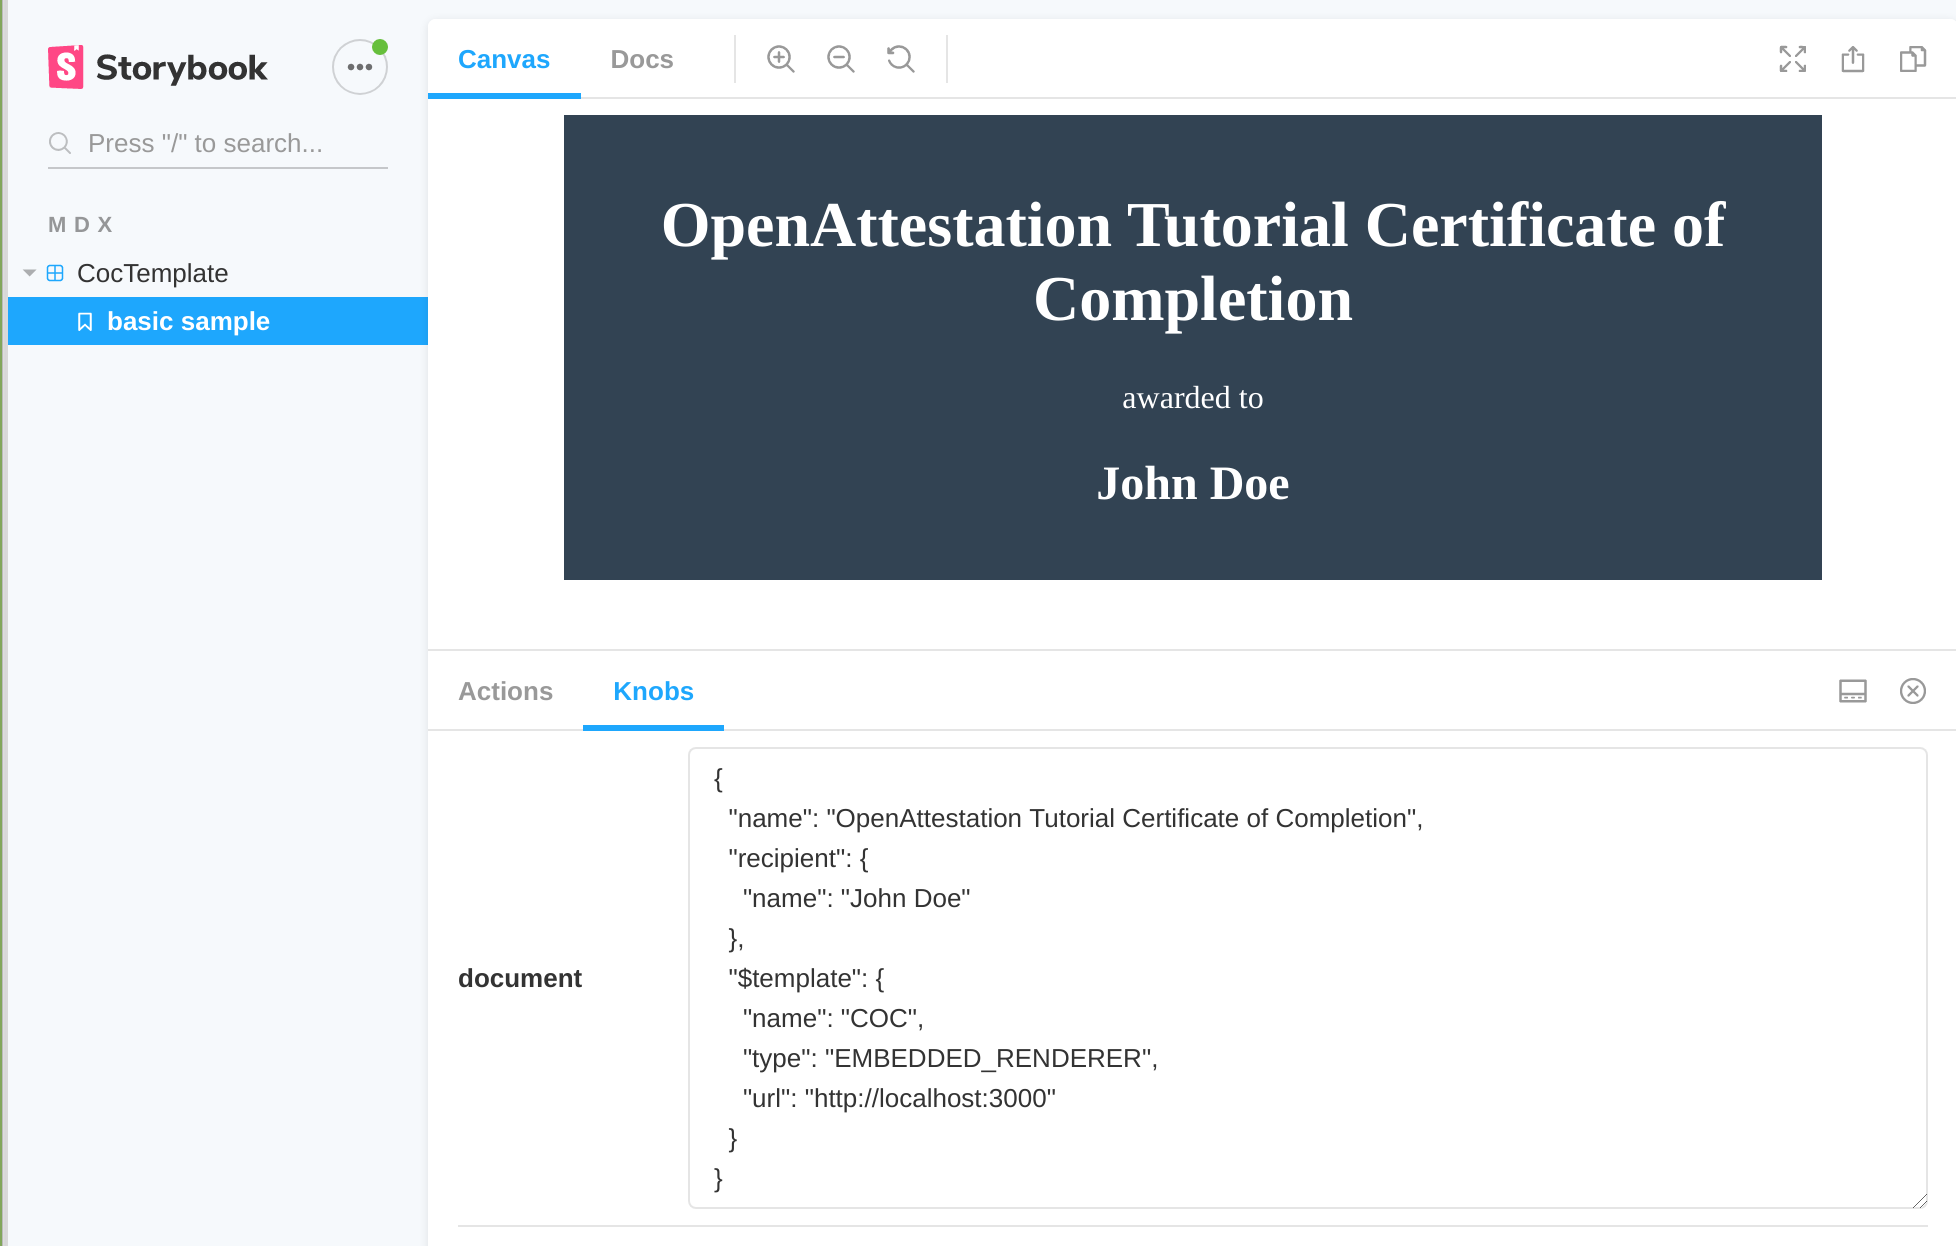
Certificate of Completion template configuration
An OA document can have multiple views, with each rendered in a separate tab. For example, an OA document that is a degree certificate may have the actual certificate as one view, and the transcript as another view in a single template.
A demo of the multiple-view feature is available here.
Your 📜 Certificate of Completion will only use a single view.
Create a file named src/templates/coc/index.tsx with the following content:
import { CocTemplate } from "./template";

export const templates = [
  {
    id: "certificate",
    label: "Certificate",
    template: CocTemplate,
  },
];
templatesmust be an array, where each element corresponds to a view (or a tab). Here it needs only one view.- Each view must define the following properties:
idmust be a unique identifier for this template configuration.labelwill display in a tab in the application, which loads the renderer.templateis the component that will display.
Renderer template configuration
src/templates/index.tsx is a file containing the configuration of all the templates available in this renderer.
To register a new template, add it as a key to the registry constant.
Note: The key is case sensitive and must match the
$template.namevalue defined in the document data.
To add the new COC template, replace the src/templates/index.tsx file content with the following code:
import { TemplateRegistry } from "@govtechsg/decentralized-renderer-react-components";
import { templates } from "./coc";

export const registry: TemplateRegistry<any> = {
  COC: templates,
};
If you open src/index.tsx, you will notice the registry defined above is used and provided to a component called FramedDocumentRenderer. This component will handle the connection to the application automatically and display the correct component depending on your configuration. For more information, see this github repository.
You are ready to build your document renderer and deploy it online.
Deploying the document renderer
Push code to GitHub
Create a new GitHub repository and push the code there.
For a step-by-step guide on importing source code to GitHub, read this guide.
Deploy the site onto Netlify
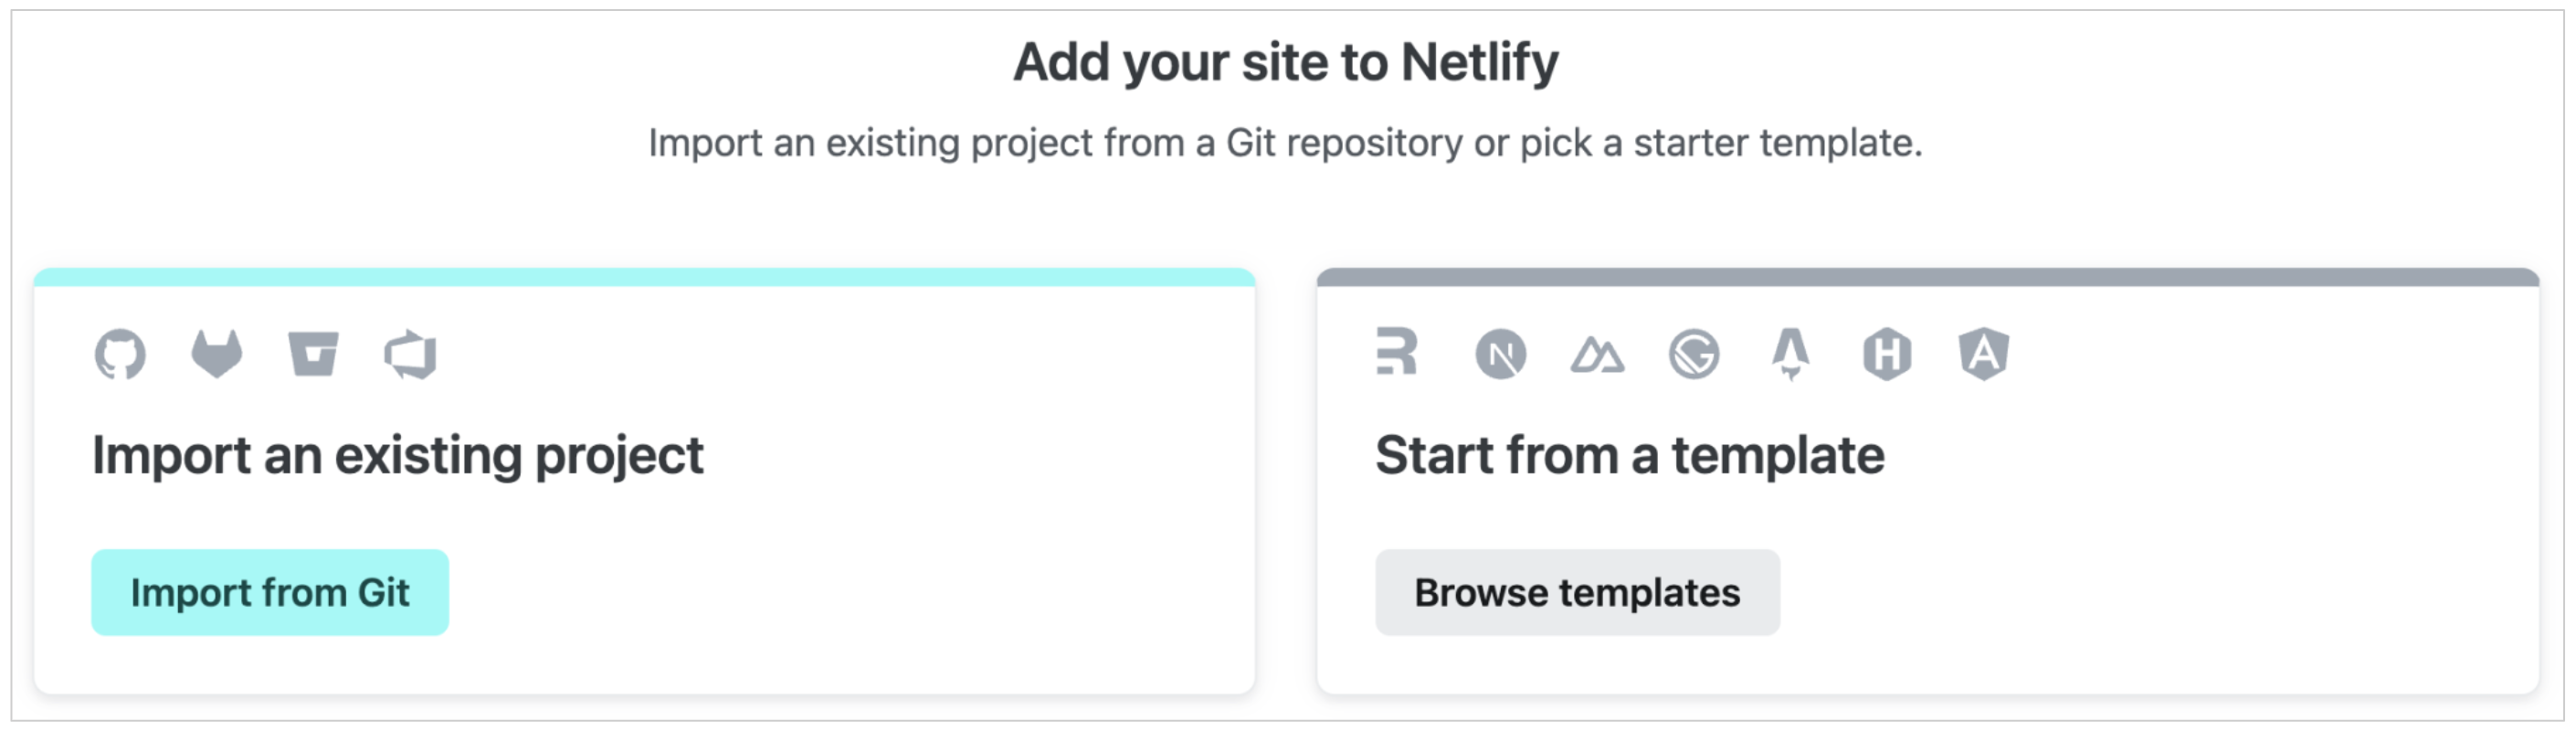
Once you have your code on GitHub, build and deploy the site onto Netlify.
-
Log into Netlify.
-
Open your team's dashboard. Click Sites on the left navigation. The "Add your site to Netlify" page displays.
-
In the "Import an existing project" section, click Import from Git.
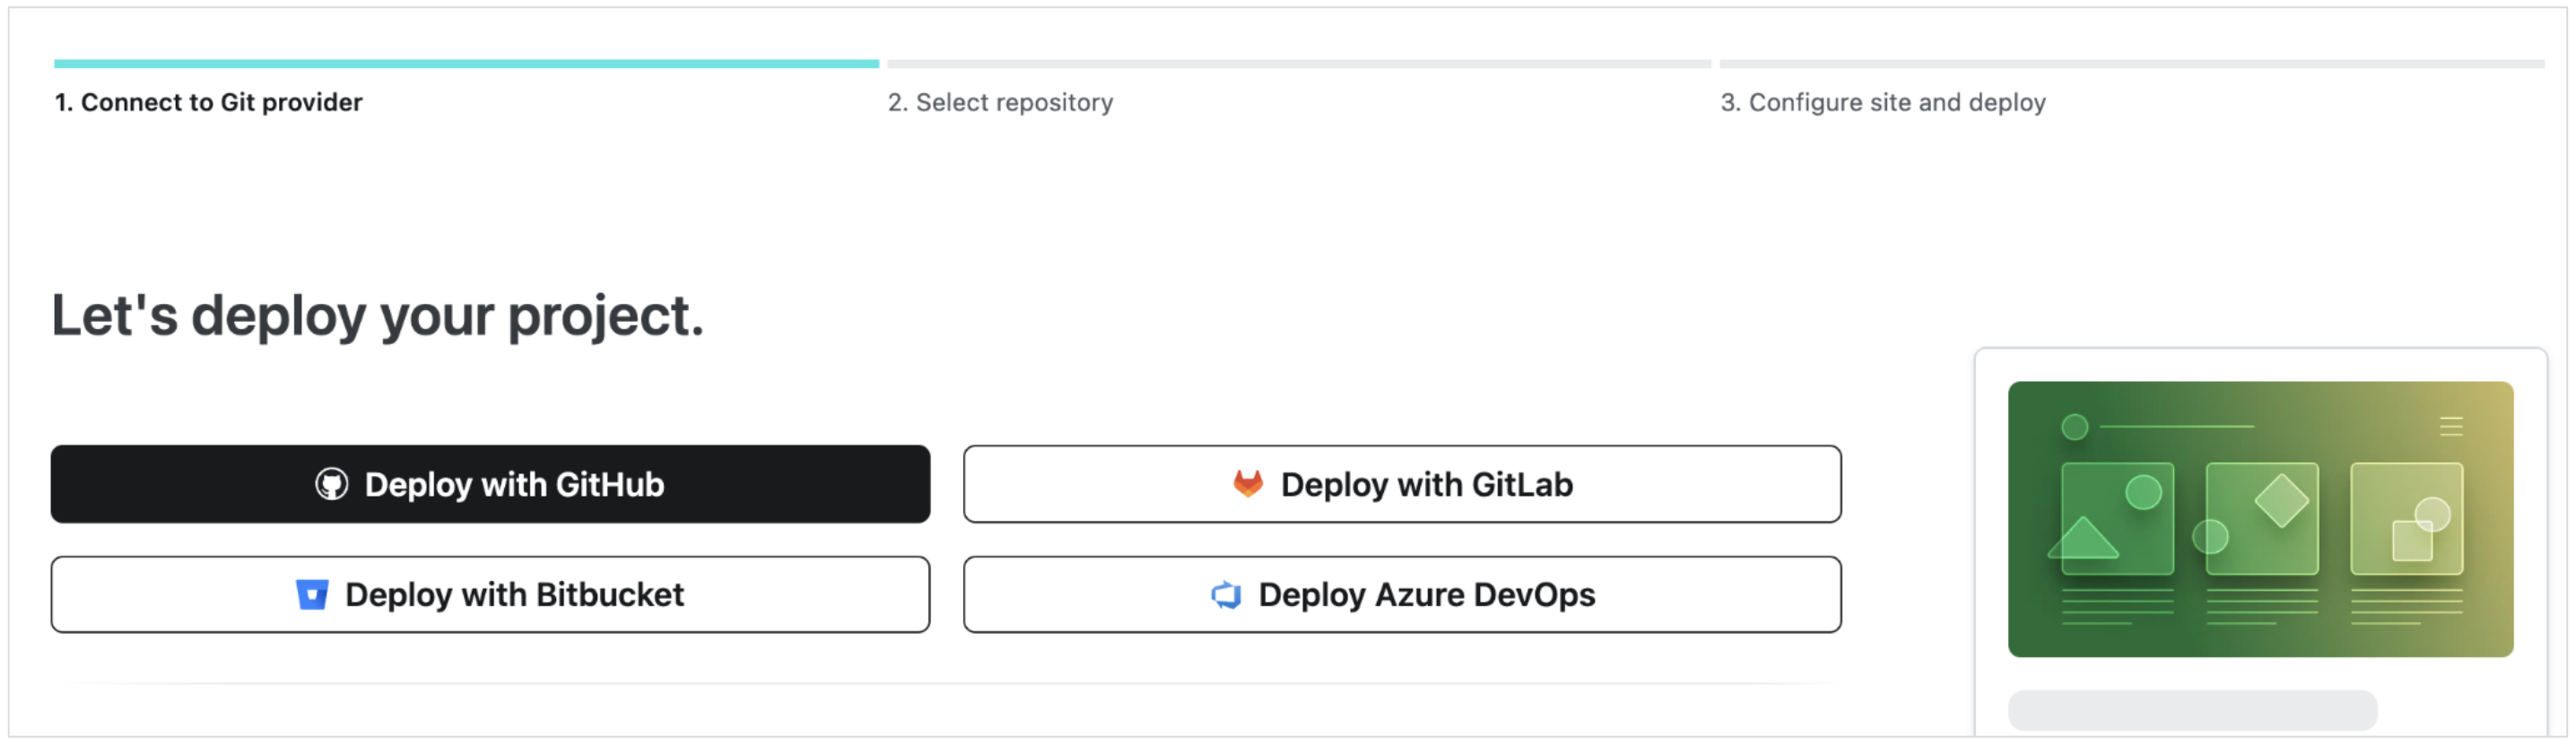
-
Select Deploy with GitHub. The authorization page displays.
Authorize your GitHub account and select your repository.
-
Review the configuration for your repository.
In the "Build settings" section:
a. For "Build command", enter
npm run build.b. For "Publish Directory", enter
dist.c. Configure other settings as you need.

-
Click Deploy <Repository_Name>.
-
Once the site has been deployed, you will get the URL to the document renderer site.
In this example, the URL is
https://frosty-joliot-c02c3d.netlify.com/. The website will be an empty page when you view it directly. This is normal, because it is not meant for direct viewing through a web browser.

Important: Save the website URL for future reference. You should also update
$template.urlin your OA document.
Additional note for production document renderer
It is recommended to use a custom domain you own for the document renderer website in production. This prevents locking in to any specific third-party hosting provider.
If you are using Netlify, check out how to enable custom domains.